Showing posts with label kids in the garden. Show all posts

Wednesday, May 28, 2014

Kids in the garden: It's a frog party


This time of year frogs are everywhere, N found this one as I was driving the 'gator around the corner, I heard super high pitched screams- which- as I got closer I could discern as "WHAT KIND OF FROG IS THAT?! WHAT KIND OF FROG IS THAT?!" Anyways, after we got over the shock of the find we christened him Croaky and captured him to take out to the garden, and show Dad, of course.

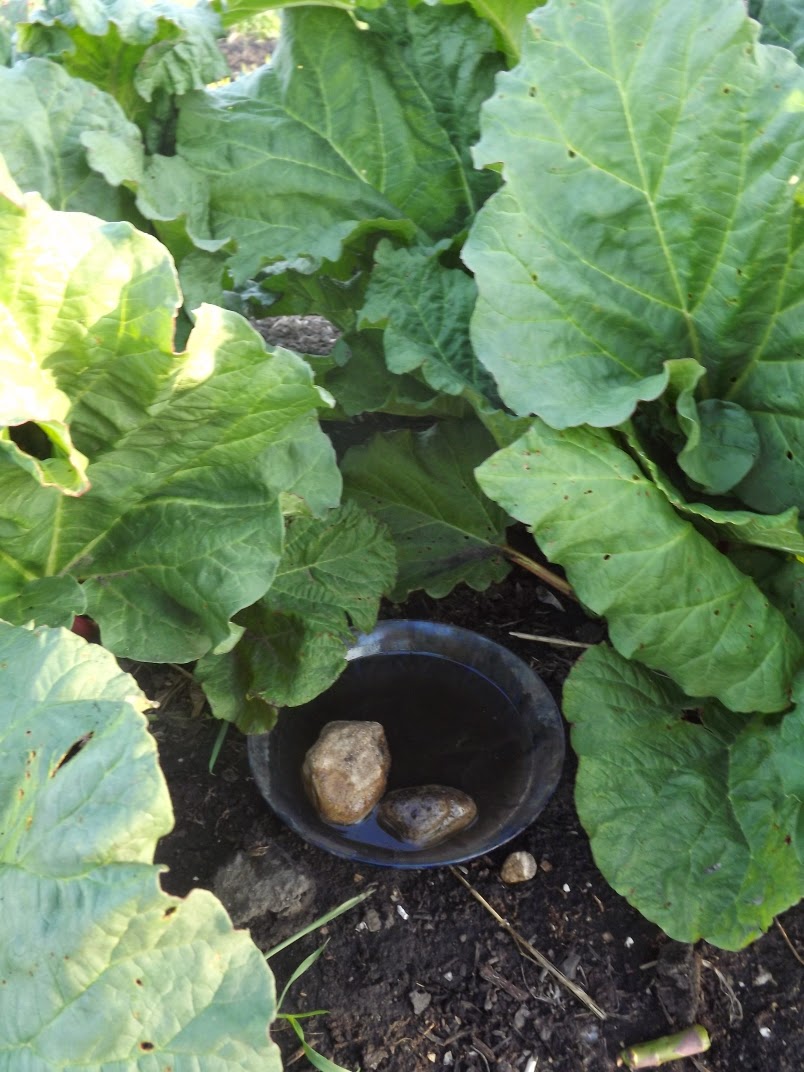
Frogs are great for your garden, they eat bugs, and not plants, and they're great babysitters in the garden as well, they'll keep the kids busy for hours with their jumpy escapee antics. One way to induce frogs to stay in your garden is to give them little habitats, with a shallow dish of water and some rocks to perch on.


Croaky is a Copes Grey Tree frog, we identified him using the Manitoba Herps Atlas which is a very cool site.  Here are some more tips about Frog friendly gardens. Most of those are around the yard anyhow- it's a bit of a frog paradise around here. Some of the most important things are ponds, brushpiles, and not using insecticides, mainly.


Here is our little frog dish- under the shelter of the Rhubarb leaves, in Croaky's new home (temporary, but don't tell the kids, they think he's still there). A little bit of moisture can go a long way for a frog out of a pond, and it's a great way to talk to talk to kids about Camouflage too- as the frog will inevitably 'get lost' several times while they're looking after him, only to be spied right in front of their feet, a moment later.

Thursday, March 20, 2014

Kids in the Garden: String for the Birds


It's the Spring Equinox today- and we like to mark these days a little bit at least, bring the seasons into our life in a real way- and teach the kids to be a bit conscious of it at the very least. It's a cool thing that the days and night change in our part of the world, and I think we should notice it, if not celebrate it. I suppose they change in most parts of the world- except the equator- and that's always in our discussions of why we could never move to Hawaii- we like the fact that the days are shorter in winter and longer in summer*.

Anyways we decided to mark today with a little tribute to the birds- a basket full of soft nesting materials, which they can use to build nests- fitting for the first day of spring I think.

Step 1: Gather supplies- yarn, string, hair, thin strips of cloth, all cut 4 to 6 inches in length. Cat hair, dust bunnies, soft batting, and roving are all good too.


 Step 2: Prepare all the materials, talk about how the birds will pick things up, how wide do the kids think the fabric needs to be- how big do the clumps of stuffing should be.


Step 3: Stuff it into the basket- I used an empty free hanging Suet basket- though I think you could also just hang a bunch of stuff from a tree- loosely tied around the middle. My basket was 4 dollars though and we'll use it again and again.


Step 4: Hang the basket from the trees outside and watch the birds build nests- you can probably identify some of the string if you happen to see it in nests later in the summer.


I think we'll probably have this basket hanging for a while before it sees too much use. It's still too cold here for Robins- but once they come they'll use tons of nest building supplies. It's still a nice way to mark the Spring Equinox though. Here are some links related to birds and nest monitoring- Project Nest Watch, BioKids, Birds Nest Safari- Highlights


* We just learned the other night that originally clocks in England made the hours longer during a winters night, and shorter during a summer night- that's how they figured it out- so the sun would always set and rise at the same time- but the hours were not a consistent amount of time. Midnight in January would just drag on and on eh?


Linking this post up to Green Thumb Thursday over at Little mountain Haven- if you're stopping by from there leave a note in the comments- I'd love to hear from you!

Wednesday, March 5, 2014

Kids in The Garden: Winter Sowing


Winter sowing is an awesome way to get some seeds started, and get your hands in some dirt in the middle of winter. The basic idea is to plant seeds in a 'mini- greenhouse'- then put them outside and let them sprout naturally when the time is right. The seeds will only sprout when it's warm enough to do so- the only danger is if you get a freak warm spell- and the seeds start to germinate and grow- and then you get freezing temps again. We don't often have that here- and if it did happen then all you need to do is take them inside. The greenhouse (I use milk jugs- cut most of the way around the equator- leave a little flap to keep the 'lid' attached and with holes poked in the bottom), will keep the plants protected at night, and will amplify the sun during the day- plus they catch the snow and rain. It's a good system - especially with seeds that need to be cold stratified (they need to freeze and thaw to break the seed coat) to germinate. What I like about it is that it frees up space and time when I need to start planting things indoors- because I can start them early to no ill-effects (as long as it's too cold for them to germinate outside the seeds will be safe)- also it's a great project to get kids to help with.

I've had mixed results with this method- here are some things I think work best:

Pick seeds that would self sow naturally in your garden or your area. that means that if they fall on the ground one year and then sprout the next- you can be sure to get some plants growing in your milk jugs.

Often in my area- they plants in the containers are slow to start- and I've found that for most annual flowers I'll often get blooms faster if I just direct seed in the garden. Lavatera, Nigella, Baby's Breath and Calendula all were much bigger when I planted them in early spring direct in the ground.

Perennials work great- and are worth the effort and time. I planted one jug of Creeping thyme for a walkway in my herb area- and it was big enough to transplant in July. That seems late- but actually it's perfect because it gives you a bit of time to get the annuals in the ground, and the veggies sorted out.

You need a sheltered area- from the wind - but one that allows full sun exposure too. This is tricky.

I've also found that keeping the container in a big sled or something is great for moving them here and there- but- it also keeps the water in during a rainfall- and even if you dump it right after- the seeds will still have floated around in there- some getting deeper- and some getting too waterlogged- and all getting messed up. This really affects germination- I've always had one or two plants come up- but sometimes no more than that- I'm not sure what the solution is - probably a sled with drainage holes in the bottom.

Some plants that really work well: Bachelors Buttons produce like crazy, my sister has had great success with Lettuce, Echinacea is not bad either, and Creeping Thyme. I'll let you know how the others fare this year...

Okay so on to the project:

Step 1: collect milk jugs and make greenhouses- there are tons of tutorials online for winter sowing, or making mini-greenhouses out of recyclables- be imaginative!

Step 2: fill with dirt- I like to put a thin layer on teh bottom and tamp down really well- the girls love to do this- then if you're going to add a slow release fertilizer this is the place to do it. Then fill with the rest of the dirt. I also like to wet my soil (or pro-mix- a sterile growing medium), first- and then mix it around to make sure it absorbs the water well. Fill the jug with about 2-3 inches of soil- gently pat down.

Step 4: Label the jugs- with the variety, and the date - just for curiosity's sake.


Step 3: Sprinkle on your seeds- not too many- but more than the amount of plants you want- if you have small children- getting enough seeds in there won't be a problem, trust me.

this is a good step to get some learning in- I usually let them hold each of the seeds and then we talk about it's shape and why it would be like that- tiny snap dragon seeds in the top photo, and giant hollyhock seeds in the bottom. Talk about the ways that seeds are spread out- by wind or animals, or just by dropping on the ground. Hollyhocks are big tall flowers- so they have papery wings to catch the wind and spread out.


Step 4: Once the seeds are in- gently cover them up and tamp them down again- then water the jug gently and tape up the sides.

Step 5: take the jugs outside and find a place to dump them. this year I'm trying under a spruce tree- facing south. I had to shovel out a little spot for them.


Step 6: Cover the jugs up with snow- or not- if you live somewhere with no snow (but then if you live somewhere with no snow- you should probably just put the seeds in the ground, and call it a day).


That's it- don't forget to check them when the weather warms up, and water accordingly, also on extra warm days you will probably want to open the lids so that the plants don't heat up. Also here's an awesome link for kids info on seeds here at the university of Illinois "Great Plant Escape".

What do think? will you try a couple of jugs this year?

Linking up with Little Mountain haven's Blog Hop- check it out!

Thursday, February 13, 2014

Kids in the Garden: re-grow your lettuce


This is the first in a series (maybe weekly, we'll see how fast I run out of ideas), of ways to get kids involved in gardening- other than ordering them to weed.  There are a lot of benefits to getting them into gardening, but it can be hard to find stuff that they can do and understand, and that are still compelling enough to keep their interest.
Some of the reasons to garden with your kids:

It helps them to get started on building curiosity about how the world works, and it's an easy way to get them to engage with the world, and to see that there is more going on out there than it seems at first.

You probably know way more than you think you do, and once you get going- you'll learn more, so it's a bonus for them to see you explain something other than how to clean their rooms.

It's a nice way for kids to get their hands dirty, and for you to approve, which they love.

It introduces them to new foods, and will definitely make them eat more veggies.

It teaches them about environmental stewardship- which is so important!

It provides a nice friendly way to introduce science to them- and the idea that science is all around us, and actually applies to real life (what you didn't know that gardening has loads of science in it? it's true, stay tuned...)


Okay so first lesson and it's February, and it's Manitoba, and everyone is dying for something fresh and green, so re-grow your lettuce!

Step one:

make salad- and save the tiny core of baby leaves from the middle- the ones that are all yellow and pale looking  it should look like this:


Explain that the leaves are light yellow because they were sheltered from the sun when they were growing by the outer leaves- you can show the difference to you child by showing the leaves you put in the salad. Explain that a plant produces Chlorophyll in response to the sun, an action which is called Photosynthesis, and that Chlorophyll is what makes a plant green (you can go further with this explanation if your kids are older- but N is 4, so the idea that plants turn green because of the sun was enough of a wow factor for her).


Step Two:

Plunk the plant in some water, about an inch- up to the bottom of the leaves in fine,  and put it in the sun, change the water daily to prevent nastiness.


Check the lettuce daily for changes- on day two it should look like this:


See how the leaves are much glossier and greener- that's the Chlorophyll!  Also see how they're opening up a bit? That's to make room for the new leaves growing in the center.


We didn't separate those leaves at all, they did it on their own! Amazing! (especially to a 4 yr old!)

Step Three:

After about a week or so in water- put the plant in soil, it should keep growing- after about a week in soil it'll look like this:


Notice how many more leaves there are, and also how green they are from the sun. There's another difference too- the leaves feel much crisper, and stiff (you could talk about a plant's vascular structure here- and how water brings the plant more support- but again the difference was enough for a 4 yr old). From there I'm not sure how long until you eat the lettuce, a couple of months at least, longer than in summer probably because the days are shorter. That's an experiment that could be added on to this- measuring the growth and seeing if there is any difference between summer outside and winter inside!

Here's a link to more info about Chlorophyll and Photosynthesis: Biology 4 kids