Showing posts with label Pottery. Show all posts

Tuesday, June 17, 2014

Monday Inspiration: Roman Bartkiw

Bartkiw, Pommes Dore, 1996, (source)
Roman Bartkiw, (1935- 2010), was a Ceramist and Glass artist. He is apparently known for his innovations in glass work- though I can't seem to find out what those are or see any of his glass works online. There are some ceramic birds online- but mostly on ebay and Kijiji, and I can't seem to find the real site only find them on google images. Someone could doubtless find more images of his work in person, or also if they had more time to search online ( I have the time bomb of a soggy diaper soaking through my pants- Oh! that reads as though it's MY diaper! If this is the first time you've read the blog- rest assured I have children- it's almost always their pee on me- not my own.)

I really love this work though- the simple lines and distilled forms are so soothing, and powerful at the same time- it's really lovely. You can read quite a bit about him here. He's collected in several museums, the AGO, and the Museum of Civilization.

Monday Inspiration 2014 is all about Canadian artists. Each Monday I'll pick a new one to profile- If you can think of any that you think I ought to look up- please let me know in the comments- I'd love to hear from you. You can find a list of the artists I've done so far here. 

Monday, May 26, 2014

Monday Inspiration: Edith Carr

Edith Carr, Painted Jug, 1906 (source)
Edith Carr (1856-1919), was Emily's older sister, she looked after the Carr siblings after her parents death. Apparently art ran in the family because she also painted on china, and won awards and sold her pieces too. She was also a founder of the YWCA in Victoria B.C.

The painting on this piece is growing on me, nicely composed and probably at that time pretty different from other painted china. I think in 1906 china painting was a much more delicate business, (I'm thinking roses and baby's breath) with small very detailed scenes being the norm, so perhaps these chunky cherries would have been outstanding then. It's certainly a lovely little pitcher, the colour choices work well, and though now it seems a little ordinary- like I said- in 1906 perhaps it was quite special.

Monday, April 28, 2014

Monday Inspiration: Roseline DeLisle

Roseline Delisle, Octet 2 Blue, (source)
Roseline DeLisle, Octet 9, (source)
Roseline DeLisle (1952-2003), was born in Quebec and then moved to California, she made these huge ceramic vessels- which were very reminiscent of the human figure- They are all quite striking when seen all together in one room (you can see her standing among them in this article- which is quite interesting too), they really relate to each other in different ways- I can only imagine what walking through them would have been like- they have so much presence. I love the smooth solid colours, and the sleek shapes- so refined and cold- yet somehow in that scale they seem warmer- more personal. The sheer technicality of them blows my mind.

 I can see in them, the influence of the early parts of this century- they are so millennial. It's a bit odd,  like seeing a movie you remember so clearly seeing when it came out, but now looks so dated, and you realize it's already almost twenty years old. These pieces do that to me. They will no doubt stand as an excellent example of artwork from that time- and I do honestly love them, but it's just too soon to overlook the dated feel of them, sort of like jelly shoes and hammer pants.

Wednesday, April 16, 2014

Work In Progress Wednesday: Circus Circus


These are close-ups of a rectangular casserole I'm working on-it's in the very early stages here. It's Vintage Circus inspired- which is something I really love- all the big fancy embellishments, almost Baroque- but much more playful, also fun repeating patterns, bold stripes, and of course elephants. Who doesn't love elephants?

I'm slowly starting to make more pieces so I can fill my kiln and fire those tile samples. and then I can get started pumping out the tiles for the back splash. But also I'm thinking I should plan to do a few more sales- craft shows and the like next fall- The girls are now getting to the stage where I can work for a little bit- N will be in kindergarten next fall- so I'll have much more time I think, (though A will be two so we'll be heading towards that style of fun). Anyhow, at the rate I go for completing stuff, I should have a decent amount of stuff to offer come next fall, if I can stay on track that is (with Spring sewing time coming I'm not sure how on track I'll be- but I shall try...If you're trying to stay on track by avoiding the siren song of spring sewing do NOT look at this,or this,or this, or this- but seriously how awesome is that last one?)

My thinking is to make a lot more oven to table style dishes, oven safe- good for regular use, but highly decorative, and not out of place with the 'good china'. There is a LOT of the typical brown country style pottery around here- I think the younger folks could use something different, a little more colourful, not as traditional. I think really functional ware need not be plain- though it's true that more embellishes benefit from hand washing, but really any casserole dish benefits from hand washing, right? What do you think, any favorite types of dish that you'd like to see in pottery, but don't too often?

Wednesday, March 12, 2014

Work in Progress Wednesday: Grog tests


The only work being done this week in my studio is grog tests for tiles. It's not too exciting- though it is exciting to see the pattern play out over more than one tile (the bottom left hand corner has one wonky tile from the first mold I made- I just used it to get done a little quicker- it's total crap- so happy I squared things up). So you can see how the pattern will repeat- I'm pretty pleased with it- though the real test will come after it's glazed.

Okay let's get a little technical- I'm using Plainsman M390 clay for these tiles- mainly because it's what I use for everything else- it's a good plastic clay- that holds up well to hand building, and is really white once fired so it looks good with bright colour glazes. I'd like the tiles to be glazed with my regular glazes- so I don't have to worry about testing and formulating new glazes- so M390 it is. The only thing about this clay is that it's not grogged- and non-grogged clay leads to warping and irregular shrinking, and it's tougher to work with as a tile. So I'm opting to try and add fine grog (fired clay dust basically) to the M390.  I'm also trying out some homemade paper clay (by wedging 1 ply toilet paper into the wet clay).

My method for adding the grog is to wedge it into wet clay- I know this makes my measurements a bit off percentage-wise- by adding dry grog to wet clay instead of dry grog to dry clay- I'll end up with a higher grog percentage, But all my percentages will be higher- so when I say 5 percent it's probably closer to 7, 2.5 closer 3.5 etc. Also I don't want to go to the trouble of mixing my clay from dry- unless I have to- I think it's safer for my lungs to work with the grog if I incorporate into wet clay because it's less dusty.

I started with 10 % dry grog ( 100 g grog - 1000 g wet clay) It was difficult to wedge in, and not very plastic, the clay got very dry, fast, it was unworkable.  I diluted the 10% mix  down to 5% by adding another 1000g wet ungrogged clay. The 5% clay was slightly dry, but as a result it came out of the mold quickly, and it dried nicely, the 2.5 % was not as quick to unmold- but it was a bit smoother- and dried down more, the.75% was smoother still- but also not as quick to unmold- it was the most like working with plain M390.

So far I like the 5% the best; the tiles dried very flat- they felt more solid and thicker right from the mold- they could handle a bit of sliding and flipping without deforming. My only concern is on how the grog will fire- Straight from the bag it looks grey- and I wonder if I'll be left with grey flecks in the white tile. That's why I'm also trying Paper clay (clay with paper fibers in it)- which would undoubtedly fire white.

Also I'm using a trick to help the tiles dry flat- waxing the edges with wax resist- so that they dry more slowly than the center. This works great for me, I've gotten the plain M390 tiles to dry flat with waxed edges and careful covering- but I'd rather have a sturdier clay mix so it's not as finicky. Next I'll get my paper clay samples done, and then make a bunch of stuff to fill the kiln so I can get firing these guys.

Wednesday, February 26, 2014

Work In Progress Wednesday: Plaster

The plaster mold from the last version of the tile- nice and dry now. 

My kid is standing on the table while I work- Chaos reigns.

A close up of the squirrel sprigs- these guys are so wee and cute.

Squirrel range of motion sprig molds- and plans for some squirrel-y casserole dishes. And the ever present baby feet.

This week has been taken up with my finally carving some sprig molds of squirrels that I've had crawling (or jumping, rather) around my brain since Christmas. A sprig mold is like an applique but on clay- you make a shallow model- and then mold it in plaster. I was going to do another tile mold- just so that I had at least two plaster molds to work from while making tiles- because there's quite a bit of drying time in the mold- so it would speed the process slightly, and I'm using an old 9x13 pan for the tile- because it leaves nice big edges and therefore a solid mold, but there's room in those edges for sprigs- or smaller tiles too- then it's not such a waste of plaster.

That's all for clay this week I'm afraid- Baby A has started taking 20 minute naps- then waking up briefly and sleeping on me for another hour or so- it sort of ties me up, during that time n is supposed to be having quiet time- watching a movie or something- so that I have a few minutes without someone speaking at me during the day- but she's started getting bored with all that- not enough time outside on these frigid days, I think, plus just you- know- being four, and very talkative (we were talking about her being a superhero, and she was wondering who her sidekick should be, and I suggested Brownie her stuffed horse- but she said it should be me- because I'm always helping her do stuff- which is funny because I always called her my sidekick- but the times they are a changing, I suppose).

If you have any projects on the go in your neck of the woods- leave a link in the comments-I'd love to see.

Thursday, February 20, 2014

In the Studio: Time for T (Squares)*


Here is the tile for the back splash in our Kitchen, in it's last mold phase e.g.: trying to make it into a functional tile that will work, and not make my Husband crazy when it comes time to put them up. The first mold I made back in November did not turn out great- I used mold soap instead of petroleum jelly to grease the mold- and the tile slid around while I was pouring the plaster in which made it less square and crisp than I needed- luckily I could still press out a couple of tiles- and so I pressed one and then set about fixing it up to re-mold it.

 Mostly I had to smooth out a few spots  and make the Wheat motif a bit thicker- so that it didn't disappear on the edge, and add a ton of clay to make the edges square (ish). You can see in that photo that the bottom of the tile is about a 1/4 inch out at the bottom- which would make it a nightmare to grout- and also not look very good, though I do like the 'not quite perfectness' of the edges and the slight rounding of the corners- It has to be a proper square- otherwise it will bug the shit out of me while I'm cooking, looking up at my mistakes tiled behind the stove. Otherwise the project is moving along- I'm on to trying to figure out the best combo of clay and grog to reduce warping and shrinkage, and perfecting drying methods next... It's starting to get a bit technical- which I love- but which makes things a bit boring for everyone else...like watching clay dry...literally.


* I know it's not actually a T-square in the picture- but for the sake a cute post title- let it go. Oh god now I'm looking at the picture thinking how much better it would be if it were a t-square...so much more balanced...

Monday, February 17, 2014

Monday Inspiration: Alice M. Egan Hagan

Alice M Egan Hagan, Scaup Duck, 1897, (source)

Alice M.Egan Hagan, Redheaded Duck, 1897, (source)
I'd never heard of this artist before stumbling upon her works online, I really love them though, She was a china painter, though she worked in other mediums too- and in the 1930's became a studio potter- making the whole pot-(which is a different animal altogether than china painting). She worked as an artist her whole life into her 90's, and was quite influential.

In 1897, when she was 24, she painted these 12 game plates- as part of a set of china that was painted by Canadian women artists- (how I would love to see that set- next time I go to Scotland I guess...). Her plates were celebrated as some of the best, even though she'd only had a few lessons in china painting. I always wonder at the 'china painting' years of women's art- it seems so twee, or precious nowadays. I can't imagine a woman of this era painting on china - unless it was ironic, or some sort of activity that unskilled people do for fun- but in those days that was the medium for women to work in- seriously, seriously talented women- it seems ridiculous to me, but then, look at the plates- they are so beautiful, and they do really show what she was capable of, maybe it's not a disservice at all.

More info on Alice Hagan- here at the Art Gallery of Nova Scotia

Monday, November 18, 2013

Sketchbook: tiles


Designs for the tiles for the kitchen- plus some extra designs just for fun. I'm having a bit of a hard time deciding what the final tile will be-  I think I'll end up making a few designs and molds and deciding after they get the glaze on. It's a tough thing to mentally translate these designs into the finished product- because the dark lines will, of course, end up just as raised relief, so it's won't look as busy. The sketches are a pretty basic diagram of the finished product, which will be all one colour (probably white- or some pale variation thereof), with the design carved in bas relief.

The larger tracing paper allows me to see the whole pattern together- to make sure that things line up etc. It's also useful for transferring the images- (and for making me reel back in horror when I see how 'seventies' the pattern appears in black and white- not to worry- it's much more classic looking when carved).

posting along with Jane.


Saturday, March 23, 2013

In the studio


I know I said I would do a weekly post about what is going on in that newly minted studio of mine, but certain events have kept me from it. We were in a car accident a couple of weeks ago, and so I've been taking it a little easy in the studio. (We're all okay, the kids especially are completely fine, K and I are recovering quite well- just the usual sort of stuff, the car however, is not recovering, so that's a real bummer, because we'd only had it 3 months or so).

Anyhow- I've been carving some mugs, making them with a wider base and a straight sided cylinder shape instead of the small base with slanted sides which I was making before. The small based mugs are awfully tippy, there is some sort top to bottom width ratio that I am missing out on there I think, and I don't have the uninterrupted time at the moment to work out a better angle- I may do that in the future. The wider bottom gives the mugs a really stable feel, originally I felt like the straight cylinder was a bit clunky, but it's growing on me now, and I really like it as a shape for carving, it has an appealing straightforwardness. Also it makes the rim quite even, without losing the charm of hand building so I like that.

I've also been carving a few of them too- which is much less time consuming on a small scale, and I really like that, I like the lavishness of a hand carved mug, something a bit extra special for an everyday purpose, I think that's where functional handmade items shine.  I've also been tinting some slip and doing some Sgraffito work, some little tests, which I'm pretty excited about, they don't photograph well at all- because the slip needs a firing to make it darker, but it's basically coloured slip inlaid into the clay body, I'll show some images when/ if ever I get the kiln fired.

For the record this is what the majority of time spent in my studio looks like:


I really love the idea that it takes ten thousand hours of dedicated practice to become masterful at something,  at the rate I'm going, I'm sure I'm mastering something... though it likely isn't ceramics. Whenever I meet up with someone who asks me about what sort of art I've been making lately, I have to resist the urge to point to my kids and call them art.

Friday, April 27, 2012

In the studio


I'm most charmed by the carving on this piece, and the glaze looks much better in this photo than it does on line.


Mostly sewing this week folks, a bit of jean patching for the Hubby, and some maternity shirts- which I'm working on a tutorial for, also a few alterations on a dress I bought myself a while ago (on sale- beautiful print and fabric, but sort of weird spaghetti straps/ unflattering fit). I'll take some photos of them when the sun comes out again- they're summery tops, and the weather has been a little wintry this week (well- it was 25 at the beginning of the week, and now it's freezing rain on Friday, so who the heck knows what season it is in Manitoba)

I also fired the Kiln and glazed my vases- which I was less than impressed by, perhaps that's why no clay has gone on in the studio this week. I'll re fire them- but all in all the colours were too wishy washy, and the gloss surface that I love on mugs, is just not right for carved pieces, it's looks a bit too, I don't know flashy, and I'm going for classy. So yeah, back to the drawing board.

I'll mix up some satin matte glazes and see if any of them will do better, also I'll try some more intense stain levels, maybe that will be what I'm looking for- they're very pastel right now, and just not jiving with the image I have of them in my head. I'll get there in the end, I know (I'm not garaunteeing how far away 'the end' is, mind you) though it can be so frustrating to have it turn out not quite right. Time to get he sewing stuff cleared away, and get back  on the clay horse I suppose.

Friday, April 20, 2012

In the Studio

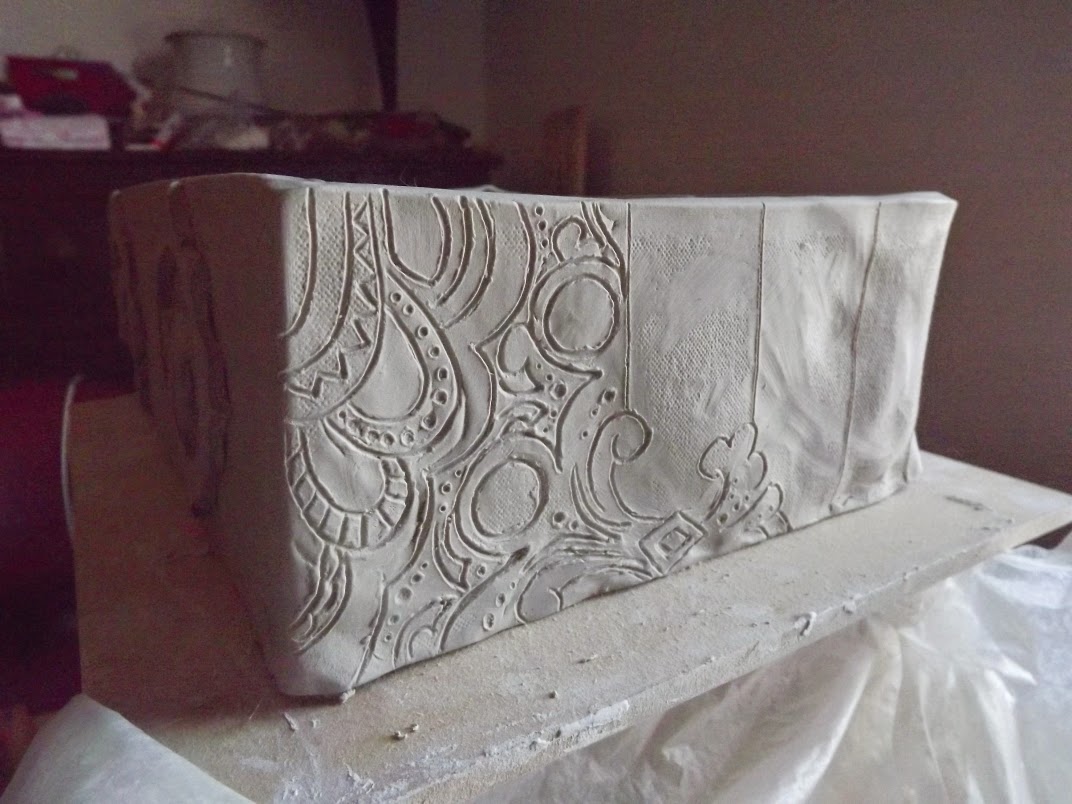
Fiddlehead carved boat

My 'helper'- in this case a small plastic farm boy- who was helping me adjust the pot
you'd be suprised at how often this happens.

the pile of beckoning bright fabric


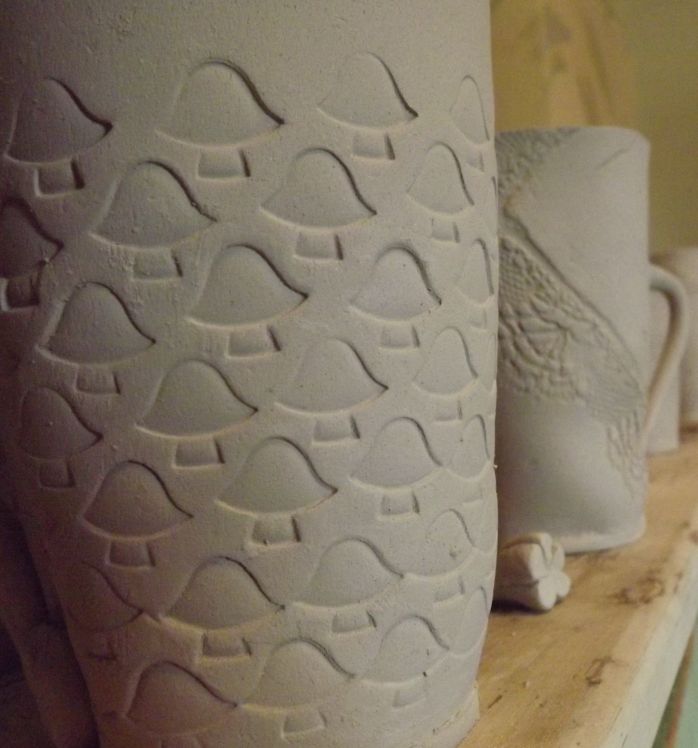
I'm a little picture light this week- but a bisque kiln produces no photos- and I spent the week carving some gravy boats. I also made a cake plate- which was about 60 percent what I wanted it to be, so I recycled it. I could have saved it- the old me would have cried over it a bit (not literally), but I would have spent some time trying to patch it or sand it or just generally make it work. Really it's much better to just scrap it- before you fire it.

I have learned that by working regularly- when I only make a few things a year- whatever they are, they get precious, and I try very hard to save it from it's proper end, but when you work regular hours, and therefore produce lots of work (or more than you are used to producing), it's much easier to let it go. I think that comes from my painting background a bit too, when I painting doesn't go right- we paint over it until it is right- we are in complete control of that medium. But Clay is different- it's a bit wild, it depends on how it dries, and what type of clay you used, and how you attached it, and once it cracks, warps, slumps and then dries- it's usually too late to fix it. That is the correct moment for quality control- not after you fire the darn thing and then decide it's not really good enough- because you see- before you fire the clay you can add it back to water and re use it, but after it's fired you just have to throw it away.

Anyhow- I began writing this because I wanted  to write about my studio hours, I have wanted to set up regular working hours for a while- and only in this past month have I actually been able to manage it. I now work from whenever I get up until lunch time, N keeps herself occupied with snacks and shows right next to me, occasionally 'helping' me, and I get some work done. And I'm surprised at just how much work you can get done, just by putting in actual part time hours, I figure I'm spending 20-25 hours a week on clay right now, and that's ridiculous to me because I 've spent most of the last two years on baby and toddler time, which is like being in a time vacuum. I know I'll have to go through that vacuum again when the next babe comes along- but I'm so happy to have discovered that a couple of years in I'll be able to actually produce work again. It's thrilling.

So I know I wanted to try seasonal studio time, but I think I'm going to keep it up through the summer, maybe cut back to quarter time, do an hour or two of studio work in the morning and then go out to the garden, If I can until the baby comes. Because the one thing that happens when you make work is that you realize how much more stuff you want to make, and how many more hours you need to make the things you want to try (on my list are cake plates, carved canisters, french onion soup bowls, shorter vases, platters, and dinner plates).

Anyhow- after carving three gravy boats this week- and with the Babe getting up earlier and earlier (damn that summer sun),  I was feeling a little clayed out- and I think I'll try to get some sewing done this next week (as well as some more mugs), a couple of cotton maternity shirts, and some jean patching, in some bright colours is just the remedy I think.

Friday, April 13, 2012

In the Studio


the drying luminaries

the three surviving luminaries, and a couple of carved vases.

It was a glaze firing week- so that means *goody*- some colourful photos on the blog- not just drying clay colour (though I snazzed up the sidebars a bit in an effort to give you something colourful or spring like to look at). Mostly mugs in this kiln, and I was really pumped that I love at least some of them. That's the one thing about Clay- you just never really know if the glaze is too thick or too runny or just right until it comes out of the kiln, and by that time it's usually too late to do anything about it. Unless there's not enough glaze which is easy enough to re-fire, if there's too much, or the wrong colour, or you accidentally had a smidgen of black glaze dust on your finger when you put that otherwise perfectly glazed robin's egg blue platter into the kiln, then too bad- that one black spot will just have to stay there (I think, unless anyone has a solution for that one?????)

So mostly a successful kiln, my glazes worked better over texture a bit thinned out, and I also mostly by fluke discovered an effect that I love- a Watercolour-y looking effect, where one colour sort of runs into another and the brush marks stay defined. I usually glaze by painting on- it's just easier for me to control- I get too spastic wild with dipping or pouring, though my official reasons for painting on glaze is as a nod to my painter's heart; I really love when you can tell how an item was made- you can see a seam on a hand built pot, or you can see the brushstrokes on a painting. I want to see the method used in the medium. I've had this brushy effect happen before- but only on flukey pots, that I couldn't recreate, and so I was thrilled when I found a way to do that on these mugs, and I was conscious enough when I glazed them so hopefully I'll be able to do it again.

I think I've also discovered that I love Plainsman's P370 clay- it's the one that I feel most comfortable with- and it's got a great finished colour, very classy looking clay, and it's a bit firmer so I find it easier to hand build with. I just started working with Tucker's cone 10 Porcelain clay too, I made a couple of vases out of it- which was okay, but it's pretty soft, so I had to let them harden up quite a bit. I did however make these luminaries and I'm hoping they will have a bit of transparency when I high fire them. The plan is for them to be transparent in the lace pattern, and if not them to shine out through the holes I drilled. I made about 50 thousand of them- but only 3 have survived so far- they're pretty thin and delicate.

I was hoping for them to be for a sale- but I suddenly got an idea about making lots and lots of them, and having on the floor of an art gallery somewhere. I seem to be drawn to handkerchiefs right now, and I think I may have to put together a body work with that in mind, maybe including my mom's wedding dress? I don't know it's still embryonic, and knowing that the next grant deadline in in September, and the baby is also due in September- makes me a little nervous, though not enough to stop thinking of it. so yeah...

Friday, April 6, 2012

In the studio: March 26-April 6


A slightly pale glaze test- things turned out a little less saturated than I'd like-
 but it did give me a testing starting point or two.


Okay so I missed a week last week I actually got a lot done- but I didn't get a post written- also I didn't get much done this week, so it's sort of a catch up post. I did a glaze fire and a Bisque fire since I wrote last- finished a carved platter and a carved vase, and just today loaded another glaze kiln, so I've been keeping up- of course I've also been increasingly filling pots and starting seeds, so that's been keeping me a bit busy.

So yes- on to the pots- I've glazed the birch carved gray boat- and I really love it- I think the size is just right now that it's fired down, a bit big- but also big enough for a turkey gravy, and I love the way that the black glaze rubbed off highlights the carving. I also love the seashell platter- it looks very special in person, though small- it shrunk down to almost dinner plate size- though actually I think I may do more un-carved (with maybe a small pressed in lace embellishment) for a set of oval dinner plates- just clear or white glazed would be nice I think.

I did have a few stinker mugs though, most notably the four diamond impressed ones- which I did in four colours, rubbed off on the outside solid on the inside- I took off too much in some spots- not enough in others- they are going back in the kiln to see if I can improve them- I really loved the pattern. I'll have to make more like that- oh well, c'est la vie, especially in clay.

Also we've been dreaming up a stone patio area with a clay oven outside, and clearing up some rather scraggly trees around the yard, not to mention the super unsightly rock garden. And inside all the early stuff is planted, and the flower seeds are winter sown in milk jugs, things are looking mighty green around here...

Friday, March 23, 2012

In the Studio


Smaller child size mugs, this one personalized for N, I love how it looks, I may have to do one for myself too.

This one is for my niece- the lace may be too girly for her- but I think a nice black glaze will win over her pre teen heart.

Lots and lots of running this week, mostly with manic looks of glee on her face.

I have got a few more mugs made this week, I'm actually finding that I can make about 10 in one day- then put handles on the next day, or about five with handles in the time that I can also keep N busy with a show on her travel DVD, (not the best parenting techniques, I know, but I've got to get some work done right?). After that she wants to 'help' me, or to eat chocolate chips non-stop, and that's not good for anybody. Of course I still have to finish smoothing them and shaping the handles before they get into the kiln, but it's been making me feel pretty productive anyhow.

I've been working on a couple of different sizes of mugs, the first ones I made were so giant they would give me a crazy caffeine rush If I drank a whole one. So a few new sizes including a child's size, will go into this batch, and hopefully one of them will be just perfect once fired. (Clay shrinks as it goes through it's drying and firing processes, so it's always a bit of a guessing game as to what the end size will be, there are people who can figure this out with precise tests and Math- I am not one of them)

I'm planning on firing a glaze kiln this weekend too- a few test glazes for some new colours, I want to get a nice spring green colour, and maybe an orange one as well, but I'm not sure I can do it from my current colours. I use stains to get my glaze colours, in the same clear base glaze for ease, and I generally love them, I have used oxides in the past, but it's more difficult to get a bright candy coloured hue, if it's at all possible. The other thing I love about Mason stains is that they seem to mix like paint- as in a blue stain and a yellow stain will make a green one, which mostly doesn't happen with oxides as they derive colour from chemical interactions, not pigments. 

This is how I think they work after a few experiments, but I don't know if they all work like that- or if it's just that particular yellow stain, with that particular blue one that just happen to make green, (if it is just some random thing then that is just the pottery god's way of screwing with painters who make pottery). Anyhow, I plan to do a big glaze test using all my colours and mixing them methodically to see what else crops up.